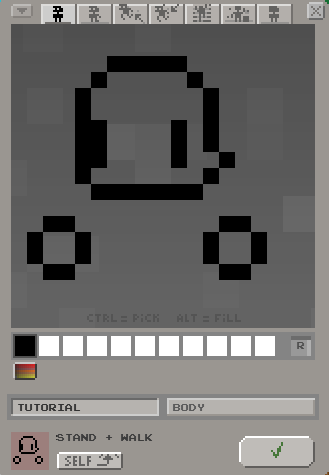
This is how I make custom skins. This is a generic body type that you can use in your own creations and edit however you wish.
To start I always create a head and hands.
From here, we can go in many different directions: Monster, Androgynous, Animal, Alien....but since this is a tutorial, let's keep it simple. To make a male skin, you can add feet and a short haircut. To really drive home the point that this is a masculine body, you can even start the shoulder line above the chin, to give the illusion of broad shoulders.

To make a generic female, connect the feet to form a dress and lengthen the hair. Shorten the shoulders to give a more feminine look.

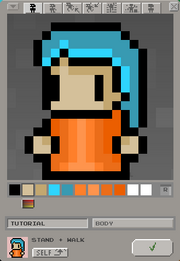
Now let's add some color. I use two colors for skin, two for hair, and four for the outfit. For gowns and dresses I usually put the lightest color in the middle, then go darker towards the border. For the hands, I'll add one pixel of the darkest skin tone in the inner top right corner to create some contrast, as well as add a darker skin tone shadow along the hair and right side of the face. While making your own custom skins, experiment with how you add color. Changing the shading can result in some very unique looks!

The way you add the rest of the cells is going to depend on your own personal style and preferences. For me, I find it faster to draw over the outline; you may find it easier to just copy and paste the first cell and edit it directly.
With the walking cell, create the idea of movement by changing the placement of the hands and face. You can do this in different ways. For this tutorial I moved the head one pixel to the left, moved the left hand up, the right hand down, and added a foot. For the foot I used the darkest skin tone. If you wanted, you could also use a different color completely, to give the illusion of shoes.


You can see a preview of the movement in the bottom left. Once you have the placement you like, color in the rest.


For jumping, I like to move the eyes up 1 pixel so the character looks like she is looking upwards as she jumps. Lately I've also been including one foot and one hand raised up.


For falling I move the eyes down 1 pixel (from the default position). This way the character appears to be looking down as she falls.


You can add a lot of customization to the jumping/falling cells. These two cells, more so than walking and standing, have the greatest potential for personality. Take some risks!
For climbing I copy and paste the image from the first cell, then fill in the face with the hair color. Then I smooth out the hairline. Since the character is climbing, I'll add a foot.


I use the same base from the climbing cell for my creation cell, but I fill in the foot since she's standing still now.


Finally, the blink cell. Just copy and paste the image from the first cell and add an extra pixel to the bottom pixel of the eyes. In this example, our character has plain black eyes. If we were using two-toned eyes, use the darkest color.

